Stock Tank Gardens

Since it is Mother’s day, and all a mother really wants is help in her garden…I thought I would share the garden I recently put in for my mom.  Mom needs an easy, low maintenance garden that is safe from animals, wind, children, birds and well everything the wild west will throw at her!  She wants to grow herbs and salad greens which she eats daily, as well as some other vegetable that she loves.  Because she lives in the windy, exposed high desert, we needed a container garden situation.  Wooden beds work well, but splinter in the sun and the nice ones are pretty pricey so we chose galvanized stock tank beds.  You can fit them in your car and have a garden growing in one day!! They are high enough you don’t have to to kneel down and you can just pull up a stool and work them if you can’t bend over.  You can grow in any size galvanized steel- even buckets, but these tanks have a drainage hole so you don’t need to drill any holes!

IMG_6056

These tanks cost a hundred bucks each, but they will out live me so I figure it is worth it!   If her gardening experiment doesn’t work she can always turn them into bath tubs, storage bins or simply resell them!  You can get stock tanks locally here and here for starters and pretty much any farm & fed or hardware store.

IMG_6058

Mixed cut and come again lettuce

I made little hoops with 9 gauge galvanized wire like I use in my garden and in the fields but be for warned, you do need bolt cutters to cut the wire.  C3D775C6-6943-4815-9369-A1F768CCE8AF 
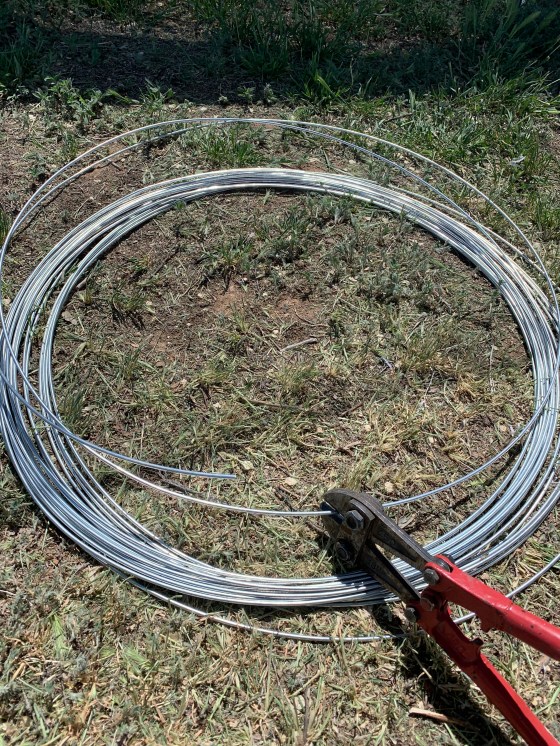
With a piece of medium weight ( 1.5 oz) row cover over top, which they sell by the yard at Agua Fria and Plants of the SouthwestIMG_9923We used plastic clips to attach the row cover to the tank and clothes pins to hold the row cover to the wire hoops bought at Walmart.

stock tank clip

These medium size clips are perfect for keeping the row cover attached to the tank


IMG_6059

Broadcast sown Spinach

For filling the beds I filled them 1/4 up with old rocks and gravel we had laying around and them a piece of weed barrier.  On top of that I made a soil mix with

1 part Native soil

1 Part shifted compost

1 Moonshine

( which can be bought locally at Agua Fria Nursery)

1 Part Cocopeat

( which can be bought locally at Agua Fria Nursery)

(I used a 5 gallon bucket to = 1 part)

I mix all that in a wheel burrow with a sprinkle of water.

How much is enough? I did 5 loads using this recipe so that is  5 – 5 gallon buckets of each material.  I made a video for you but an unable to upload it so for now here is a whole post on homemade soil mixes if you wanna give it try.


IMG_6067

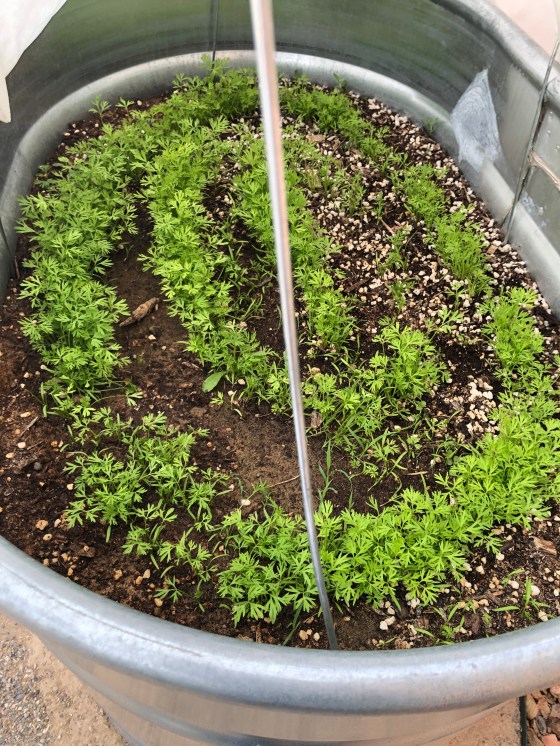
Carrots are sown in circle in case we want to add irrigation.  They are sown very thick so when you thin them you can add the baby greens to salad- yes they taste just like carrots!

I hope I made that simple enough to inspire you to give it a try.  It really is super easy and highly productive.  I think mom is pretty happy with her high desert harvest today!

IMG_6013


The Extended Garden Tour

What an honor to have our little 1/5acre of paradise featured on Soule Mama’s Blog this weekend.  I was shocked at how many visitors this little blog of mine got and since a few of you asked to see more, I am so happy to share.  You may have noticed I love taking pictures of my garden just about as much as I love taking pictures of my kids, so I have a lot of images to share.  I put together an extended garden tour from photos I have taken over the past 5 years when I started this blog of mine, so it was also a good reflection for me to see how far we have come in seven years… so with no further ado, Welcome to our humble abode…

IMG_8891

My husband is kind of a twisty wood collector, before we got married I think he thought he would retire early and set up a twisty wood furniture company… well, no early retirement for this papa of three, and now our gardens are all hemmed in with twisty wood creations…lucky me! He also built that ladder out of a single black locust log up to a tree nook in the box elder where he wove the branches together so it feels super cozy for the little birds who hang out up there.

IMG_4124

When you enter you will inevitably be greeted by a curious small person.  This very small person helped my weave these low garden fences out of willow we gathered together and hauled up the lane from the river.  They keep the babies out of the garden and the constant layers of leaf mulch in. ( mulch is a must in a desert garden)

IMG_8889

As you can see, I never remove weeds from the yard, I simply pull and lay them down in place.  In the desert they dry up in a day or two and act as mulch, skips the step of buying mulch. My husband has been working for years, slowly surrounding the growing spaces with bricks he finds on craigslist.  They are great water catchment, thermal mass and of course great for playing with trucks, riding bikes and learning to walk on.

IMG_2823

Another masterpiece built brick by brick by my husband. Every nook ans cranny is utilized, horno under the shed roof, cradle on the freezer, etc… we use every inch we can!

IMG_8895

Shade is key in the desert, now we have grapes vines that are almost covering it, but those grass mat fencing things work great for shade in the summer.   In the winter we remove them and have a super sunny spot to warm ourselves on cold days.

IMG_4076

Our first dinner party in the outdoor kitchen….followed by many many more!!

IMG_5181

The boys built our Horno a couple of summers back which we now spark up every May for our annual boy birthday pizza party and every November for the Thanksgiving Turkey.


IMG_1228

The garden studio craft shack was actually built for food storage, but I quickly took it over with all my crafting supplies, a girl needs a place to put all her yarn right?!


IMG_0142

It was built out of old shipping pallets and mud and straw…there is a whole blog post about the shed here, check it out, it is awesome!

IMG_8899

Another genius of my husband!! He said he had that antique O’Keeffe Merritt stove under a tarp for almost ten years before I came along.  Now I got that baby canning and baking all summer long, I barely even turn on the oven inside for months!

IMG_1670

Our washing station where of course the water runs right out to the peach tree behind the sink. And yes that is a very large salad spinner that was worth every penny!  I haven’t had a turn yet, the kids always want to do the spinning!!

IMG_8901

Step through another twisty garden gate and follow the red brick path….to your right vertical growing on the south side of the greenhouse is usually covered with tomatoes.  To your left is a vegetative hedge of Currants, Nanking Cherries, Wild Plums, Wild Roses,  and Hops all that started as twigs from the national forest service that help buffer between us and our neighbors and feed the wildlife.

IMG_2826

The grandma tree beckons you back to discover more around the bend, my husband always says it was this tree that sold him on the house.  When he moved in 15 years ago the lot was completely barren and the house in a state of disarray.

IMG_8903

A sharp turn to the north and you will find hundreds of gallons of rainwater being collected for dry days ahead.  And yes that is a Chicago fig gifted to me from my friends mom, but it dies back every year and only produces a few figs, but it’s cool so we keep it around, who knows, maybe someday the climate will change so much it will thrive year round ( the bright side right?)

IMG_2827

Peek over the garden gate and the prize vegetable await!

IMG_2828

Yep, another twisty wood gate!

IMG_8871

And here it is from the other side- twisty wood arches everywhere, I told you!! We decided to fence in the garden last year so that I could let the chickens free in the rest of the yard.  They are too messy to come into my tidy happy place!

IMG_2403

My desert maiden Amanda enjoying the Japanese knot weed ‘lawn’ while the kids enjoy her gift, “The Imaginarium“! What a great Aunty!!

IMG_2830

Kid, chicken, bunny zone

IMG_2832

Someday I would like to see a nice blue grama grass lawn here, someday!

IMG_2831

The little garden that could all hemmed in.

IMG_2833

Along the north side of the house is the drive way and a 4ft wide strip of dirt that once was the vegetable zone but now home to 20 espalier apple trees.  They act as a living fence and this is the first year they gave fruit and they are pretty as a picture!


IMG_2835

The north strip garden is now home to a ton of plants gone wild.. tomatoes parnips, amaranth, arugula zinnias and whatever else has naturalize and perrenialized itself there.

IMG_2837

Our hops monster eating the porch

IMG_2841.JPG

And back to the beginning, the front garden is mostly flowers, herbs and medicinals that are cycling through at different times of the year, mostly a spring garden but it gets lots of action all through the year with the sand box right in it.

IMG_2058

AHHH the  Greenhouse in the high season, But I will save that for another day… next time I will invite you inside for tea and a look around!

IMG_2588

Five years ago

IMG_2712

Us today, my how we have grow!!

Thanks again Soule Mama for encouraging me to share and thanks to all of you who know small is beautiful and there is no place like home!

Planting into pallets

Is there anything you can’t make out of an old pallet?  Yes, it does take more time and a bit more know-how to upcycle a pallet into a totally different and functional thing, but luckily I have an expert on my side.  Yep, Joel does it again.  This time he made me a new seed planting flat out of recycled pallet wood.

(Note: I do also do make these out new wood too, see here)

Image

=

IMG_8851

Cool Huh?  Want to try? Here is how he did it.

First, he tore the pallet apart with a flat bar to get the the lumber in order. Image

Then he used the cross pieces which were 3.5inches wide and 1/2 to 3/4 inches thick.  There was mix of oak (harder, longer lasting, heavier) & pine (softer, easier to work with lighter)


Then he cut off the split tips with the nails in them- to have clean, split free ends and not to bother with pulling out the nails.Image

Then he cut 2 pieces at 1ft long and 6pieces at 2ft long

He nailed 2 of the 2footers & 2 of 1footers into a rectangular box.  The 2 footer edges over lapped the edges of the 1 footers.  Unfortunately he moved so fast I didn’t get to photograph every step… but I hope you follow.

Image

Then he nailed the remaining 4 2footers to the bottom of the box using 4d galvanized nails. These are rust resistant and small enough that they will keep the wood from splitting, but large enough to hold your box together when it is full of heavy, wet soil.  Because the wood was irregular enough he just pushed the bottom slats together and nailed…but it is important to note during this step to leave a little space between the slats for water to drain out, but not soil.  I usually stick a quarter between the slats which has always proven to be just right.

Image

And there you have it.  Here is one I made from Redwood and screws in 2010 (in front) and the new Pallet one (in back).  Image

Similar—-but there are few subtle differences.

*The new one is a bit wider than the other.  As far as size go, I pretty much try to maximize my table space.  If you table is a 3×6 (which many tables are) you can fit 9 2×1 flats on it.  That should be more than enough (much more in fact) for all your seedling needs.  Remembering, when you start seeds in wooden planting flats you will need to divide them or thin them before they reach the garden, so leave space in you table(s) for transplants.  This is basically bio-intensive gardening, but more on that later…here is the next step if you are eager.

*The other difference is that my new flat is mostly oak and the older one is Redwood.  Both have their pros and cons

Oak- Hard, Heavy, Durable,Rot Resistant, Brittle-(Available in Pallets)

Pine- Soft, Not Rot resistant, Light weight, Cheap or free-(Available in Pallets)

Redwood- Light weight, doesn’t spilt easily, VERY Rot Resistant-(Must buy)

Wooden Flats are a great thing to add to your garden shed if you find yourself starting seeds every year.  They are pretty simple to make, relatively cheap and last many years, not to mention they are NOT plastic.  They work beautifully to hold moisture and give ample space for those babies to grow.  Many farms use them, which is where I learned about them.  Here are a few I stumble across while ambling through a sleepy farm in Colorado last spring.

ImageImageImage

Yes, I take pictures of other people’s planting flats, I told you I was a farm tourist.

Good Luck and I hope you help rescue one more lonely pallet from the back of your hardware store and put it to good use.

When you are ready here is a link to how to make potting soil for the flats and one on how to plant into them properly.  Let the sowing begin!!

Garden Cottage Studio Craft Shack!!

This is really a dream come true!  Humble as it is, a 8×8 Pallet and Mud shack….it changed my whole life and for this I must thank my wonderful husband and his crafty hands– Thanks Joel!!

Garden cottage in evening light

You see it all started last March 2011…Baby was on his way and we needed to turn the studio/storage room into kids room….So while I sat, very pregnant watching…Joel built us this little number from some old pallets picked up behind the hardware store, some mud and straw (instead of a baby shower we had a cob party!! Thanks Everyone) insulted the roof with packing peanuts, (that thrifty guy), and finished it off with a marvelous over hanging roof that added outside storage and of course shade, nothing says loving like a porch!!

This photo was taken of the same spot a few years earlier. Where the Cottage now stands was an outdoor shower over the well house

Now, almost two years later, on this cold winter day, I sit snug in this perfect little space creating like I was born to do.  Gems hang in the winter light among pattern books, sewing machine, yarn, and all kinds of materials to weave together into something beautiful, someday.  My challenge is pacing my creative self, knowing in time it will all get made, and  tearing myself away when life…or my toddler need tending.  I just feel so grateful for this space, quite, calm, focused, a sanctuary for my spirit to rest and my hands to run wild.

New Jewelry for Next weekends Holiday Craft Show

New Jewelry for Next weekends Holiday Craft Show

Because my husband is a crafty genius himself, I thought I would share the making of this little craft shack, and a few of Joel’s words about the process.

When my wife and I were expecting a baby, and my shop was too full of stuff to work in, we decided to build a shed on top of the concrete slab roof of the well house. We’d been using it as root cellar for a couple of years and also needed a pantry and a place for the used sunfrost freezer we’d bought.  Our goal was to build an attractive (it is right outside our living room window) temperature-stable, weather tight structure using as much waste material as possible. It also turned out as a good way to use up scrap wood cluttering the yard.

You can see the concrete slab over the well house is the floor, and the pallets being placed together as the frame

I decided to do a modern twist on the traditional jacal technique of Northern New Mexico. Upright posts are set in the ground and the whole thing is plastered over with mud.  Instead we used wooden pallets and filled and plastered them with strawy mud. Using four portland cement pallets (very strong), a 4’x 8’ “ pallet for plywood, five pallets from a cabinet shop, and miscellaneous pallets from behind the hardware store, I pieced together the walls. First redwood 2 x 4 plates were screwed to the concrete slab using tapcon screws. The pallets were attached with scrap pieces of 2×4 screwed flat to the plate that keyed into the voids in the pallets. Short pieces of scrap 2x 4 also tied the pallets to one another.

Door came from Habitat for Humanity restore and because we already had it, Joel build the doorway to fit it…it is a lot harder going the other way around.

The south wall went up first because it was against the neighbor’s fence. It was sheathed with T 111 before being stood-up. The front wall included some straight lumber for framing out the door and window openings.  A 2” x 8” ridge joist resting on upright members in the wall pallets carried the four cabinet shop pallets. The OSB on these pallets serves as the ceiling, the 2×4’s the roof joists, and the one-by skids are the nailers for the metal roof. The inside was sheathed with 1/8thinch pine plywood and the south wall and ceiling  insulated with packing peanuts.

Roof framed for extra over hang

The pallets were filled with a straw-rich cob mixture using dirt dug in the yard. This was all plastered over with the same strawy mud mix. The straw bridges the wood members and the wood members act like wood lathe to hold the cob in place. 

Strawy Mud stuck in the walls

The whole thing then got plastered over with earth plaster. The final coat was an aliz of Carle Crews’ recipe (see her book Clay Culture).

Final coat of clay plaster

Using a pallet base, a floor of douglas fir seconds was installed along with a ladder and trap door to make the root cellar more accessible. The building including electrical cost about $500 mostly for metal roofing. Many have said that would be a great extra bedroom. The big front and side overhangs make the building.- Joel Glanzberg

All Done, Pretty as a picture!!

Oh what a difference just a little shack of one’s own can make  It has already taken on so many forms, a storage shed, a herb drying/potting shed, a studio space for me to make jewelry, sew and knit, a writing studio for Joel’s New book….and hopefully some day we will..Have an outdoor kitchen under it’s eves, grow mushrooms in the root cellar, use it as a bedroom for our son when he turns into a teenager… and who knows what else the future will hold for this 8×8 shack of love.

West side storage for bikes & garden tools, love that over hang

Storage

And of course the freezer with the trap door to well house/root cellar

Stocking up space

Grilling out front

Outdoor living

Creative space

Garden cottage, looks like it has always been there, tucked away in the garden