Mmmmm, Nothing like warm fresh bread on a Saturday morning in December. With butter and Jam, oh baby, so darn good!! I know a lot of people don’t eat Gluten these days, but Sourdough actually pre-digests wheat so it is easier for us to stomach, according to this article in Weston Price’s Nourishing Traditions.
So, I say, “Bread and butter– yes please!!”

One of my fist loaves in my terra cotta chicken pot
As anyone who has ever tried to bake their own bread knows, it truly is an art. There are books after book published on the simple art of bread, centuries of experienced bakers with more than enough information to share. In my quest I read, I went to a workshop at a friends, I watched numerous U tube video (some very odd!!)….But I must say– there is nothing like practice to teach the hands what they need to know.
You see, bread baking has been part of my daily practice for a year or two– a brief time really, but after hundreds of loaves, I have honed in and refined it to a place I am very happy with. I won’t say it is perfect, or the one true way. In fact everyone I know who makes bread makes it a just a little different from one another. That is the beautiful essence of homemade – you can taste everyone’s soul in their food, craft, home… What ever it may be, it can’t be mass-produced, as it has a life of it’s own as individual as it’s maker, which to me, makes it REAL & wonderful…
But I will say, in this bread baking practice in the high desert, I have learned some tricks of this art of flour, water and a few lively critters and have pleased a few folks along the way with a warm slice of bread, so this one is for you my friends & family, who love my bread and want to know the secrets, here you go, bake away and be sure to tell me what you learn along your journey, remember every loaf is different!

Fresh bread mmmmm
Sourdough Bread Recipe- Made with a Kitchen Aid mixer
Dry Ingredients
3 Cups Flour- (I like 1 Cup Whole Wheat 1 Cup White and 1 Cup Rye)or
(1.5 Cups Whole Wheat and 1.5 cups White)
2 tsp Salt- (or more if you like)
Wet Ingredients
1 Cup Starter
1 Cup Water
Mix flour and salt in the mixer with bread hook. In a glass measuring cup mix starter and water with a spoon until blended well, much like the consistency of thick cream.
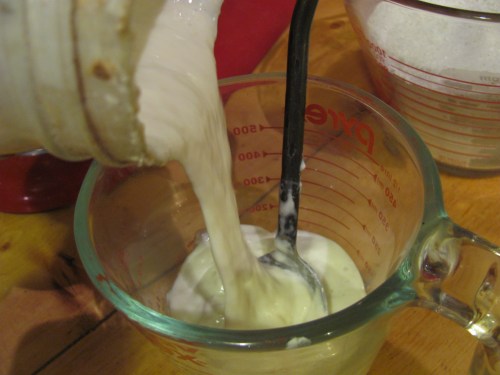
My sourdough starter is a bit goppy & sticky creating long strands as I pour
Turn on mixer on low and slowly pour in wet into dry. Run the mixer until the dough is mixed well, it will be a bit sticky, but should come away from the sides of the bowl.

Not a great picture, but you can kind of see how the dough comes away from the bowl, but sticks a bit to the dough hook
Take off dough hook and cover dough in bowl with a plastic bag and let sit over night.
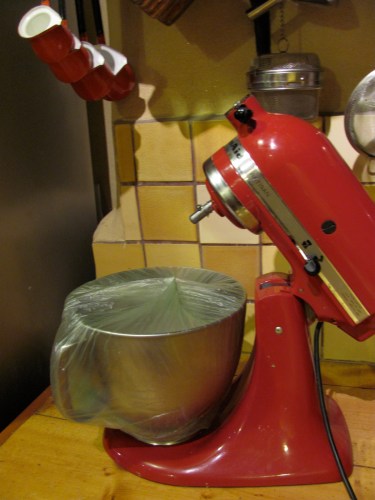
Plastic over the mixing bowl and let sit over night
In the morning (or 12 hours later) preheat oven to 500 with the baking vessel inside (I use a terra-cotta chicken pot, but anything should work that has a lid).
Flour hands and remove sticky dough from bowl, scraping the dough off the sides, make ball, tossing only a few times between your hands and lay on a floured towel and wrap loosely while oven is preheating (My oven takes about 30 minutes to get that hot).
When your oven is at 500, take out the hot pot. Open towel and place dough ball in the hot vessel, note dough will be mushy, so move quickly, just placing it in the vessel as gently as you can. You can score the bread a few times with a knife if you like.
Cover vessel and bake bread for 30 min at 500. At 30 min remove lid and bake for another 10-15 min ( brown to your liking). When done, remove bread from vessel and cool on a rack. Wait at least 30 min before slicing into, slathering with butter and devouring it will be worth the wait!!
So that is it– Try it and if you need starter I can share.
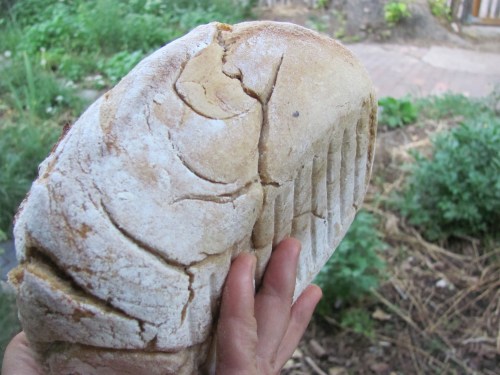
One nice thing about using the chicken pot is that is has these lines on the bottom which adds grip when slicing